I mentioned in the post before this that I had made two train sets as Christmas decorations this year and I only posted photos of the first set I made in the previous post. I am so happy with the way this set turned out that I had to do a post on its own just to show you this set.
I used the Vintage Christmas paper set from Couture Creations and I loved making this project. Not only is it a train set that will look beautiful on the mantel piece but it is gifts boxes as well. This project could be used as a gift box or a table centrepiece but I am going to put it on my mantel piece and have bought electronic tea light candles to place in the inside so that it glows.
This is the completed set with Engine, box cart and caboose.
A closer look at the front Engine, decorated with red and bronze rhines, gold brads and gold line stickers and a few Christmas buttons. The red part of the train in the box lid which comes off and you can use as a gift box or place the tea candles.
The middle box cart, also decorated with red and bronze rhinestones and gold line stickers and a decorative 25 for Christmas day. The boxes inside the cart is also part of the SVG set from SVG Cuts and it is nestled in red tissue paper.
The caboose is also a box, the red roof is removable. The windows are vellum so it will give a really nice glow once the tea candles are flickering inside. The windows are decorated with gold line stickers and some Christmas brads.
Front few of the train set, showing off the vintage button placed in front for the headlight
A closer look at the headlight. This has turned out to be my favourite Christmas decoration this year and I will be storing this away very carefully to use in years to come!
Thank you for stopping by and do pop back around soon!!
Valerie
Showing posts with label Christmas. Show all posts
Tuesday, 10 December 2013
Christmas decorations
For Christmas this year I decided to make some Home decorations and I found two patterns for Train sets. The one is from SVG Cuts called "North Pole Express" and the other is from My Scrap Chick and its called "Polar Express Train 3D paper train". I could not wait to make these train sets and this is what the sets turned out like:
A close up of the Engine - I love this set of papers from My Minds Eye - so colourful and fun.
A close up of the middle box cart
And a close up of the caboose.
First, I will show you the Polar Express Train set, I used the My minds eye paper set. The first few photos where taken just after I finished putting it together.
A close up of the Engine - I love this set of papers from My Minds Eye - so colourful and fun.
A close up of the middle box cart
And a close up of the caboose.
This is a photo of the completed project. I added two more box carts and used silver line stickers and red rhinestones to bling the train set and make it sparkle. The Santa claus in the middle box is a snow globe that lights up and changes colour. The bags are filled with red and green round chocolates.
Should you like what you see, go over to My Scrap Chick website and purchase the SVG file. I hope I have inspired somebody to try and make their own train set.
Thank you
Valerie
Sunday, 1 December 2013
Sweet treat dispensers
I found a pattern in one of the Docrafts Creativity magazines for a Sweet treat dispenser and straight away I said that it would make the nicest Christmas gifts for the smaller children in the family and friend group.
Here are a few photos of the three that I have made so far:
This is one of the box's made for a friends daughter Chloe, you lift the lid to load in the sweets and the sweets will be held in the top half of the box. There is a shelf in the top half that you twist on a kebab stick which will let the sweets then drop through a whole in the shelf to the bottom half of the box. The front part of the box where the name is is then pulled open and the sweets can be removed from the box. The christmas tree is 7 trees folded and glued together to make up the 3D tree and I glued lots of multi coloured rhinestones on and the star is glue onto the lid of the box. The Santa claus is from My Scrap Chick svg cuts. The paper range is the same as the Christmas cards and its from My minds eye.
The wreaths on the top of the box is to hide the kebab stick, and it is made from the seal on the milk bottle containers. Using pipe cleaners and a bell to complete the look of a wreath.
Thank you
Valerie
Here are a few photos of the three that I have made so far:
This is one of the box's made for a friends daughter Chloe, you lift the lid to load in the sweets and the sweets will be held in the top half of the box. There is a shelf in the top half that you twist on a kebab stick which will let the sweets then drop through a whole in the shelf to the bottom half of the box. The front part of the box where the name is is then pulled open and the sweets can be removed from the box. The christmas tree is 7 trees folded and glued together to make up the 3D tree and I glued lots of multi coloured rhinestones on and the star is glue onto the lid of the box. The Santa claus is from My Scrap Chick svg cuts. The paper range is the same as the Christmas cards and its from My minds eye.
The wreaths on the top of the box is to hide the kebab stick, and it is made from the seal on the milk bottle containers. Using pipe cleaners and a bell to complete the look of a wreath.
Thank you
Valerie
Christmas cards 2013
I have finally finished my Christmas cards for 2013 and need to get them in the post especially those that need to be posted to South Africa. My inspiration came off a card that I saw on Pinterest but cannot remember where or who it was from but I have changed it up and come up with an idea of my own. The pictures are of some of the cards that I have finished but I could not finished them complete due to me waiting for an order of rhinestones that I have purchased off ebay. I have a few of these rhinestones to finish off the ones going to South Africa but not for all of the cards. Unfortunately the photos
are of the ones without the rhinestones.
The rhinestones are round clear frosted rhinestones for the center of the snowflake and then smaller red ones to make a circle around the frosted rhinestone. The Christmas tree is stamped onto heat proof acetate and then heat embossed with clear embossing powder with glitter mixed into it. There is a sheet of patterned paper behind the acetate and then layers of cardstock and patterned paper to make up the top and bottom design. The paper set is from My minds eye collection.
Thank you
Valerie
are of the ones without the rhinestones.
The rhinestones are round clear frosted rhinestones for the center of the snowflake and then smaller red ones to make a circle around the frosted rhinestone. The Christmas tree is stamped onto heat proof acetate and then heat embossed with clear embossing powder with glitter mixed into it. There is a sheet of patterned paper behind the acetate and then layers of cardstock and patterned paper to make up the top and bottom design. The paper set is from My minds eye collection.
Thank you
Valerie
Christmas Ornaments
A dear friend of mine, Dad passed away a few months ago from Cancer and she has taken his death very hard. This will be the first Christmas without her Dad and if you have lost anybody close to you, you will know that its always the Birthdays, Holidays and Anniversaries that is the hardest.
I want to try and make this Christmas a little bit easier on the family and after watching a video from Catherine Pooler, where she was making her own Christmas ornaments, I decided to make my friend a Christmas ornament and put a photograph of her father on the front of them. I ended up making three, one for my friend, her mother and her brother.
The blue one I made with her brother in mind and I made two of the red and green ones below for my friend and her mother.
I also decided to make matching box's for them to store the decoration during the year!!
The ornaments are made using Christmas ornaments stamp set and stamping the image 4 items per ornament making a total of 20 red and 20 green. This will make only one of the ornaments. To see the original video by Catherine Pooler go to Youtube and search "Stampin up Holiday Mini Catalog Ornament".
thank you
Valerie
I want to try and make this Christmas a little bit easier on the family and after watching a video from Catherine Pooler, where she was making her own Christmas ornaments, I decided to make my friend a Christmas ornament and put a photograph of her father on the front of them. I ended up making three, one for my friend, her mother and her brother.
The blue one I made with her brother in mind and I made two of the red and green ones below for my friend and her mother.
I also decided to make matching box's for them to store the decoration during the year!!
The ornaments are made using Christmas ornaments stamp set and stamping the image 4 items per ornament making a total of 20 red and 20 green. This will make only one of the ornaments. To see the original video by Catherine Pooler go to Youtube and search "Stampin up Holiday Mini Catalog Ornament".
thank you
Valerie
Saturday, 12 January 2013
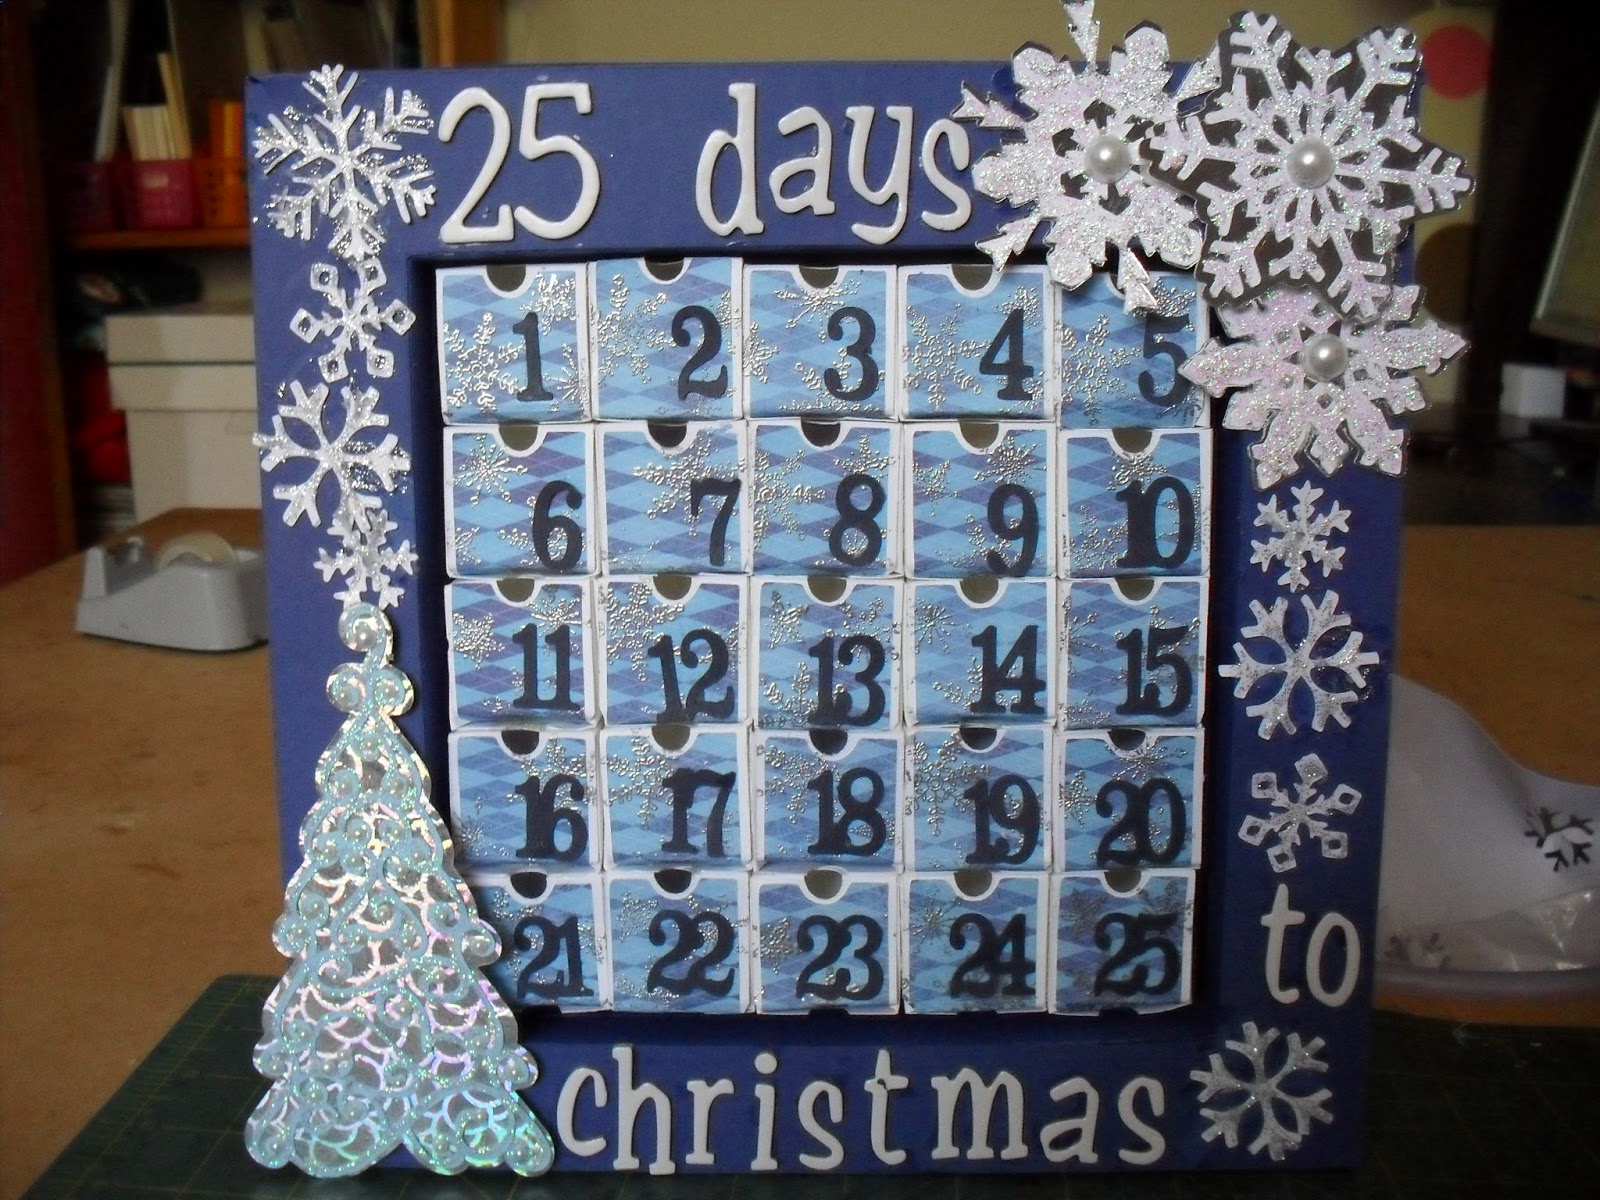
25 days to Christmas
Greetings all, This is one of the projects that is on my to-do-list that I never got round to for Christmas this year.
I bought a SVG file from the Lori Whitlock blog for an Advent calendar/25 day countdown to Christmas and really wanted to make this but did not get to it. I have been playing with the sizes of this file to make it the size I wanted and that has taken the most time. I have to confess that I have glued the boxes shut so that you cannot open them. The reason why I did that is because when putting them together I had a clever thought that turned out to be a really stupid one which resulted in my box's not staying shut. I figured I would use this as an example and remake another one at a later stage but figured I would post the end result anyway!!
Hope you like:
The blue frame is like a box about 2" deep. The outside is 9 1/2" x 9 1/2" and the inside square is 7" x 7".
The little box's inside are 1 1/4" squares and attached together to keep them together and also attached to the back sheet of paper. The snowflakes are cut from white cardstock with silver glitter glue and cream pearls. The three big ones are matted with silver mirror cardstock. The Christmas tree is cut from light blue cardstock also matted with silver mirror cardstock. Decorated with crystal stickles and small cream pearls.
The lettering is Nutmeg American CRaft thickers. The box's are decorated with Christmas paper (brand unknown) and stamped with small snowflakes and embossed with silver embossing powder.
If you want to make this project for yourself go to: www.loriwhotlock.com/blog/die-cutting and purchase the file from her online shop.
Thank you for looking
I bought a SVG file from the Lori Whitlock blog for an Advent calendar/25 day countdown to Christmas and really wanted to make this but did not get to it. I have been playing with the sizes of this file to make it the size I wanted and that has taken the most time. I have to confess that I have glued the boxes shut so that you cannot open them. The reason why I did that is because when putting them together I had a clever thought that turned out to be a really stupid one which resulted in my box's not staying shut. I figured I would use this as an example and remake another one at a later stage but figured I would post the end result anyway!!
Hope you like:
The blue frame is like a box about 2" deep. The outside is 9 1/2" x 9 1/2" and the inside square is 7" x 7".
The little box's inside are 1 1/4" squares and attached together to keep them together and also attached to the back sheet of paper. The snowflakes are cut from white cardstock with silver glitter glue and cream pearls. The three big ones are matted with silver mirror cardstock. The Christmas tree is cut from light blue cardstock also matted with silver mirror cardstock. Decorated with crystal stickles and small cream pearls.
The lettering is Nutmeg American CRaft thickers. The box's are decorated with Christmas paper (brand unknown) and stamped with small snowflakes and embossed with silver embossing powder.
If you want to make this project for yourself go to: www.loriwhotlock.com/blog/die-cutting and purchase the file from her online shop.
Thank you for looking
Monday, 29 October 2012
Christmas Cards
Christmas cards from 2010: I found this idea for "Snowglobe cards" on Youtube and I loved the whole idea of the snowglobe.http://www.youtube.com/watch?v=4yS2kVK_k5s: This is my take:
Christmas 2011: These are not my SVG files so Go to: http://svgcuts.com/index.php?main_page=product_info&products_id=284 if you want to purchase these files.
Thursday, 25 October 2012
Christmas has come early
I make my own Christmas Cards every year for the last 3 years and I have put the other cards under "PAGES"on my blog - go and have a look at the others if you have not already!!
In total its normally around 24 cards that I make for special friends and family and it normally takes me more than a month to complete the cards, so this year I decided to go very simple with the design on my cards. Makes it a lot easier when you are not making individual cards for each person. Its almost a production line when you making so many of the same thing!! But I like what I came up with - even though its not my idea, I have changed it slightly so as not to look like the original i had seen somewhere on the internet. Sorry cannot remember so cannot give credit to the person.
Anyway I never have my Christmas Cards ready before the middle of December and this is why I decided to get a very early start and be more prepared.This is what I came up with.
In total its normally around 24 cards that I make for special friends and family and it normally takes me more than a month to complete the cards, so this year I decided to go very simple with the design on my cards. Makes it a lot easier when you are not making individual cards for each person. Its almost a production line when you making so many of the same thing!! But I like what I came up with - even though its not my idea, I have changed it slightly so as not to look like the original i had seen somewhere on the internet. Sorry cannot remember so cannot give credit to the person.
Anyway I never have my Christmas Cards ready before the middle of December and this is why I decided to get a very early start and be more prepared.This is what I came up with.
Subscribe to:
Posts (Atom)